Description
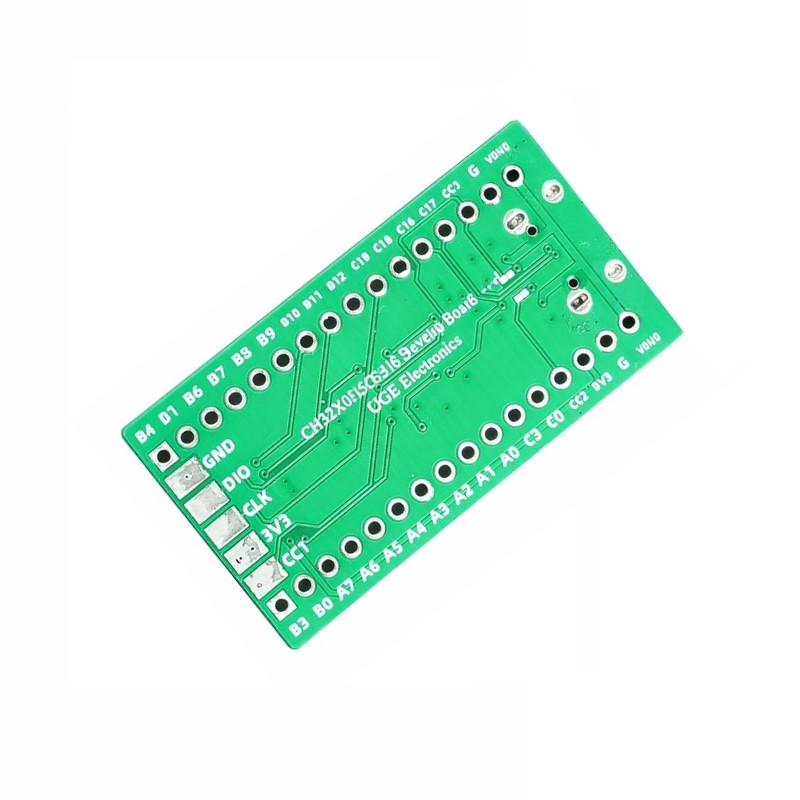
CH32X035G8U6 USB-PD 32-bit RISC-V microcontroller Development Board
Key Features
-
Based on CH32X035G8U6 32-bit RISC-V microcontroller
-
Native USB device interface
-
USB Type-C connector
-
Suitable for USB-PD related development and experimentation
-
BOOT and RESET push buttons
-
All major GPIOs exposed
-
Compact and breadboard-friendly layout
-
Fully assembled and ready for development
- Here is our Github Repo for this Product
Technical Specifications
Microcontroller
USB Interface
GPIO & Peripherals
Control Buttons
-
1 × BOOT button
-
1 × RESET button
Power
Board Type
Power & Programming
-
Powered directly from USB Type-C
-
Supports USB-based firmware development
-
UART pads available for serial debugging/programming
-
BOOT button used for entering programming mode
-
Compatible with WCH development tools and SDK
Applications
-
USB device development
-
USB-PD experiments and prototyping
-
Embedded RISC-V learning platform
-
Custom USB HID devices
-
USB CDC applications
-
Compact embedded controller projects
What’s Included
Notes
-
Ensure correct driver installation for USB communication.
-
Intended for developers familiar with embedded firmware development.
-
GPIO operates at 3.3V logic level.
-
Verify USB-PD implementation requirements depending on application.
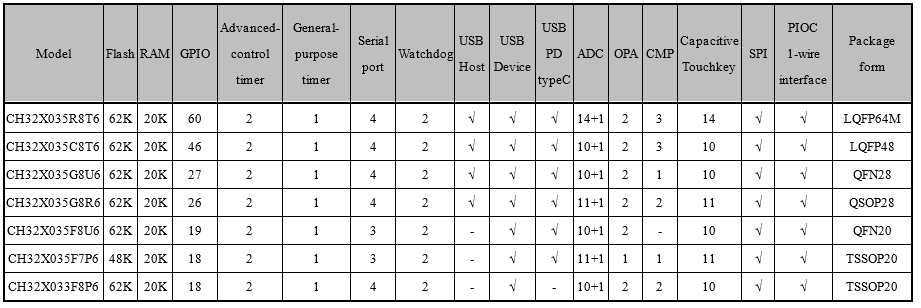
- Qingke 32-bit RISC-V4C processor, RV32IMAC instruction set
- Up to 48MHz system clock frequency
- Single-cycle hardware multiplication, hardware division
- 20KB SRAM, 48KB Flash
- Operating voltage: 2.0V – 5.5V
- Multiple low-power modes: sleep/stop/standby
- Power-on/power-down reset (POR/PDR), programmable voltage detector (PVD)
- 1x Programmable Protocol I/O Controller (PIOC), supports wide range of 1-wire and 2-wire interfaces
- 1x 8-channel general-purpose direct memory access (DMA) controller
- 1x operational amplifier (OPA) with programmable gain (PGA)
- 1x analog comparator (CMP)
- 1x 12-channel 12-bit analog-to-digital converter (ADC)
- 1x 11-channel touch-key detection
- 2x 16-bit advanced-control timer with complementary output and dead time control
- 1x 16-bit general-purpose timer with input capture
- 2x watchdog timers (independent and window)
- 1x 64-bit SysTick counter
- 1x USB2.0 full-speed device interface, 7 two-way endpoints with 64 bytes packet length
- 1x USB-PD and Type-C controller, dual role port (DRP), programmable power supply (PPS)
- 3x USART interface, supports LIN and ISO7816
- 1x I²C interface, supports SMBus/PMBus
- 1x SPI interface
- 18x general-purpose I/O (GPIO) ports, external interrupts
- 96-bit unique chip ID
- Serial 2-wire debug interface
- Factory built-in USB bootloader
Programming and Debugging
There are two ways to program the microcontroller: via USB using the built-in bootloader and via the serial 2-wire debug interface using a WCH-LinkE programming device.
Installing Drivers for the Bootloader
On Linux you do not need to install a driver. However, by default Linux will not expose enough permission to upload your code with the USB bootloader. In order to fix this, open a terminal and run the following commands:
echo 'SUBSYSTEM=="usb", ATTR{idVendor}=="4348", ATTR{idProduct}=="55e0", MODE="666"' | sudo tee /etc/udev/rules.d/99-ch55x.rules
echo 'SUBSYSTEM=="usb", ATTR{idVendor}=="1a86", ATTR{idProduct}=="55e0", MODE="666"' | sudo tee -a /etc/udev/rules.d/99-ch55x.rules
sudo udevadm control --reload-rules
For Windows, you need the CH372 driver. Alternatively, you can also use the Zadig Tool to install the correct driver. Here, click “Options” -> “List All Devices” and select the USB module. Then install the libusb-win32 driver. To do this, the board must be connected and the microcontroller must be in bootloader mode.
The bootloader must be started manually for new uploads. To do this, the board must first be disconnected from the USB port and all voltage sources. Now press the BOOT button and keep it pressed while reconnecting the board to the USB port of your PC. The chip now starts in bootloader mode, the BOOT button can be released and new firmware can be uploaded via USB within the next couple of seconds.
WCH offers the free but closed-source software WCHISPTool to upload firmware with Windows via the USB bootloader.
You can also use chprog, a simple Python command line tool, to flash the microcontroller via the built-in USB bootloader. In order for this tool to work, Python3 with pip must be installed on your system. To do this, follow these instructions. Then install chprog via pip. On Linux (Debian-based), all of this can be done with the following commands:
sudo apt install python3 python3-pip
pip install chprog
Usage example:
chprog firmware.bin
Alternative Software Tools
Serial 2-Wire Debug Interface
To program the microcontroller via the serial debug interface, you will need a special programming device. The WCH-LinkE (pay attention to the “E” in the name) is a suitable option for this purpose and can be purchased commercially for around $4. This debugging tool is also compatible with other WCH RISC-V and ARM-based microcontrollers.

To use the WCH-Link on Linux, you need to grant access permissions beforehand by executing the following commands:
echo 'SUBSYSTEM=="usb", ATTR{idVendor}=="1a86", ATTR{idProduct}=="8010", MODE="666"' | sudo tee /etc/udev/rules.d/99-WCH-LinkE.rules
echo 'SUBSYSTEM=="usb", ATTR{idVendor}=="1a86", ATTR{idProduct}=="8012", MODE="666"' | sudo tee -a /etc/udev/rules.d/99-WCH-LinkE.rules
sudo udevadm control --reload-rules
On Windows, if you need to you can install the WinUSB driver over the WCH interface 1 using the Zadig tool.
To upload firmware, you should disconnect the board from USB and then make the following connections to the WCH-LinkE:
WCH-LinkE      MCU Board
+-------+      +------+
|  SWCLK| ---> |CLK   |
|  SWDIO| <--> |DIO   |
|    GND| ---> |GND   |
|    3V3| ---> |VCC   |
+-------+      +------+
If the blue LED on the WCH-LinkE remains illuminated once it is connected to the USB port, it means that the device is currently in ARM mode and must be switched to RISC-V mode initially. There are a few ways to accomplish this:
- You can utilize the Python tool rvprog (with -v option).
- Alternatively, you can select “WCH-LinkRV” in the software provided by WCH, such as MounRiver Studio or WCH-LinkUtility.
- Another option is to hold down the ModeS button on the device while plugging it into the USB port.
More information can be found in the WCH-Link User Manual.
WCH offers the free but closed-source software WCH-LinkUtility to upload firmware with Windows using the WCH-LinkE.
You can also use rvprog, a simple Python command line tool, to flash the microcontroller via the WCH-LinkE or compatible programmers/debuggers. In order for this tool to work, Python3 and pip must be installed on your system (see chprog above for details). On Linux (Debian-based), all of this can be done with the following commands:
sudo apt install python3 python3-pip
pip install rvprog
Usage example:
rvprog -f firmware.bin
Alternative Software Tools
Software Development Tools
The Eclipse-based closed-source MounRiver Studio IDE is the official development environment provided by WCH. It supports Windows, Linux, and Mac. MounRiver Studio can be downloaded for free.
Open-Source GCC Toolchain
You can download a complete toolchain (GCC and OpenOCD) for Linux and Mac from the MounRiver Studio website. However, on Linux you can also install a GCC-based toolchain by running the following command:
sudo apt install build-essential libnewlib-dev gcc-riscv64-unknown-elf
Arduino IDE and PlatformIO Support
There are projects around to make the CH32X035 compatible with the Arduino IDE (arduino_core_ch32) and PlatformIO (platform-ch32v).






Reviews
There are no reviews yet.