Description
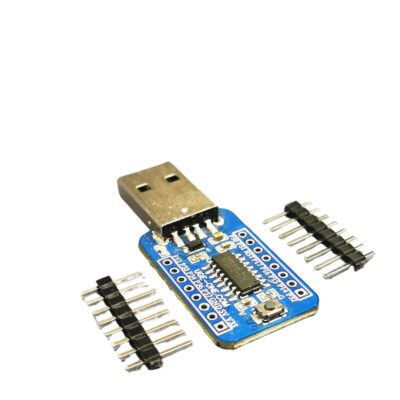
Development board for theCH552G low-cost 8-bit 8051 core microcontrollers with native USB 2.0 and Arduino IDE support.
The CH55x is an 8-bit enhanced E8051 core MCU compatible with the MCS51 instruction set. 79% of its instructions are single-byte single-cycle instructions, and the average instruction speed is 8 – 15 times faster than that of the standard MCS51. The special xRAM supports direct memory access (DMA), data fast copy command, and double DPTR pointers. The CH55x has a built-in USB controller and USB transceiver, USB 2.0 full-speed (12Mbps) and low-speed (1.5Mbps) traffic, data packets of up to 64 bytes, and DMA. It has a factory built-in bootloader so firmware can be uploaded directly via USB without the need for an additional programming device.
Product Description
-Built-in Flash/RAM Built-in 16KB program memory ROM, 256 bytes internal iRAM and 1KB on-chip xRAM, which supports DMA direct memory access
-USB : Embedded USB controller and USB transceiver, supporting USB2.0 full speed and low speed host or device mode. Support up to 64-byte data packet, built-in FIFO, support DMA
-UART: 2 full-duplex asynchronous serial ports, both of them support high baud rate communication. UART0 is a standard MCS51 serial port
-Timer: 3 groups of timers/counters, supporting 2 signal capture and 2 PWM output
-SPI: 1 SPI communication interface, built-in FIFO, support master-slave mode
-ADC: 4-channel 8-bit A/D analog-to-digital converter, supporting voltage comparison
-Touch: 6-channel capacitance detection, supporting up to 15 touch buttons and independent timed interrupt
-Small size: 4.8cm * 2.0cm
- Install ch55xduino.
- Open the Arduino IDE.
- Go to “Tools” -> “Board” -> “CH55x Boards” and select your chip.
- Go to “Tools” and set the desired board options.
- Go to “File” -> “Examples” -> “Examples for CH55x Board” and select a Sketch of your choice.
- If your board is never used with ch55xduino before, you need to make the ch55x chip enter the bootloader mode. Hold the BOOT button pressed while connecting the board to the USB port of your PC. You do not need to do this if you have installed a blank new chip on the board.
- Now you can upload your sketch.
Installing Drivers for the Bootloader
you can also use the Zadig Tool to install the correct driver. Here, click “Options” -> “List All Devices” and select the USB module. Then install the libusb-win32 driver. To do this, the board must be connected and the CH55x must be in bootloader mode.
Entering Bootloader Mode
A brand new chip starts automatically in bootloader mode as soon as it is connected to the PC via USB. Once firmware has been uploaded, the bootloader must be started manually for new uploads. To do this, the board must first be disconnected from the USB port and all voltage sources. Now press the BOOT button and keep it pressed while reconnecting the board to the USB port of your PC. The chip now starts again in bootloader mode, the BOOT button can be released and new firmware can be uploaded within the next couple of seconds.






Reviews
There are no reviews yet.